This article talks about how can we use pretrained language model BERT to do transfer learning on most famous task in NLP - Sentiment Analysis
Transfer learning is very popular in deep learning but mostly confined to computer vision. Transfer learning in NLP is not very popular until recently(thanks to pretrained language models). But this usage went up so fast starting 2018 after paper on BERT was released. BERT stands for Bidirectional Encoder Representations from Transformers. We can think of this as a language models which looks at both left and right context when prediciting current word. This is what they called masked language modelling(MLM). Additionally BERT also use ‘next sentence prediction’ task in addition to MLM during pretraining. We can use this pretrained BERT model for transfer learning on downstream tasks like our Sentiment Analysis.
Sentiment Analysis is very popular application in NLP where goal is to find/classify emotions in subjective data. For example given a restaurent review by customer, using sentiment analysis we can understand what customer thinks of the restaurent(whether he likes or not). Before the rise of transfer learning in NLP, RNN’s like LSTM’s/GRU’s are widely used for sentiment analysis to build from scratch. These gave decent results, but what if we can use pretrained unsurpervised models which already have lot of information on how language is structrued(because they were pretrained on massive unlabelled data) for our use case just by adding one additional layer on top of it and just fine tune total model for the task at hand. BERT showed that if we do it this way, we can save lot of time and also get state of art results even with smaller training data.
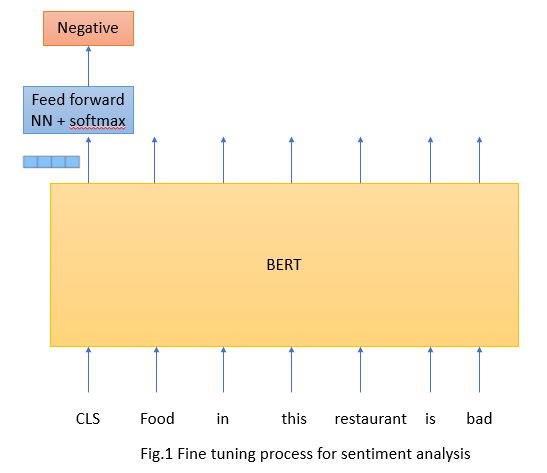
Below we can see how finetuning is done

Input traning sentence is passed through pretrained BERT model and on top of BERT we add one layer of Feed forward NN with softmax for our sentiment classification. Final hidden state corresponding to [CLS] token is used as the aggregate sequence representation for classification. According to paper, final hidden state is of 768 dimensions but for illustration I used 4 dimensions. Entire model end to end is fine tuned with objective of reducing loss for this first hidden state after softmax.
For this project, I used smaller vesion of BERT called DistillBERT. Huggingface leveraged knowledge distillation during pretraning phase and reduced size of BERT by 40% while retaining 97% of its language understanding capabilities and being 60% faster.
I tested with both base BERT(BERT has two versions BERT base and BERT large) and DistillBERT and found that peformance dip is not that great when using DistillBERT but training time decreased by 50%.
Contents:
1) Load and preprocess IMDB dataset
2) Understanding tokenization
3) Create PyTorch dataset and split data in to train, validation and test
4) Create Data generators
5) Sentiment classification with Distill BERT and Hugging face
6) Training
1) Load and preprocess IMDB dataset
# Install huggingface transformers
!pip install -qq transformers
import pandas as pd
import seaborn as sns
import matplotlib.pyplot as pltimport numpy as np
import random
import nltk

import re
import string

from nltk.corpus import stopwords
from nltk.stem import PorterStemmer
from nltk.tokenize import TweetTokenizer

import transformers
from transformers import DistilBertForSequenceClassification, DistilBertTokenizer, AdamW, get_linear_schedule_with_warmup

import torch
from torch import nn, optim
from torch.utils.data import Dataset, DataLoader
from ignite.metrics import Accuracy, Precision, Recall, Fbeta

from sklearn.model_selection import train_test_split
from sklearn.metrics import confusion_matrix, classification_report

from collections import defaultdict

%matplotlib inline

RANDOM_SEED = 42
np.random.seed(RANDOM_SEED)
torch.manual_seed(RANDOM_SEED)

device = torch.device("cuda:0" if torch.cuda.is_available() else "cpu")
path = "/content/drive/My Drive/IMDB Dataset/IMDB Dataset.csv"
df = pd.read_csv(path)
df.head()

##### Do we have class imbalance? Lets see
sns.countplot(df.sentiment)
plt.xlabel('sentiment');

We can see we dont have any imbalance which is perfect. We can safely use accuracy as our metric.
# Create the function to preprocess every tweet
def process_review(review):
  """Process tweet function.
  Input:
      tweet: a string containing a tweet
  Output:
      tweets_clean: a list of words containing the processed tweet

  """
  # remove old style retweet text "RT"
  review = re.sub(r'^RT[\s]+', '', review)
  # remove hyperlinks
  review = re.sub(r'https?:\/\/.*[\r\n]*', '', review)
  review = re.sub(r'#', '', review)
  # removing hyphens
  review = re.sub('-', ' ', review)
  # remove linebreaks
  review = re.sub('<br\s?\/>|<br>', "", review)
  # remving numbers
  review = re.sub(r"(\b|\s+\-?|^\-?)(\d+|\d*\.\d+)\b",'',review)

  # tokenize tweets
  tokenizer = TweetTokenizer(preserve_case=True, strip_handles=True,
                              reduce_len=True)
  tweet_tokens = tokenizer.tokenize(review)

  # remove numbers
  tweet_tokens = [i for i in tweet_tokens if not i.isdigit()]

  tweets_clean = []
  for word in tweet_tokens:
    tweets_clean.append(word)

  return ' '.join(tweets_clean)
# Lets apply above function to every tweet in df
df['review_processed'] = df['review'].apply(process_review)

# Also lets encode 'sentiment' column. 1 for positive and 0 for negative sentiment
df['sentiment'] = df['sentiment'].map({'positive':1,'negative':0})
2) Understanding tokenization
Now lets load our pretrained Distill tokenizer. This is learned during pre-training. It links each word to a number and is based on wordpiece tokenization. I am using distilbert-base-uncased as our model as this gave best validation accuracy on our data We need to convert words to numbers as any deep learning model will need its input as numerical value
PRE_TRAINED_MODEL_NAME = 'distilbert-base-uncased'
# Lets load pre-trained Distill BertTokenizer
tokenizer = DistilBertTokenizer.from_pretrained(PRE_TRAINED_MODEL_NAME)
Now we loaded our tokenizer, why not apply on sample text to see what it is doing
# Lets use below text to understand tokenization process
# First I am processing our review using above defined function
sample_text = process_review(df['review_processed'][0])

# Lets apply our BertTokenizer on sample text
tokens = tokenizer.tokenize(sample_text)    # this will convert sentence to list of words
token_ids = tokenizer.convert_tokens_to_ids(tokens) # this will convert list of words to list of numbers based on tokenizer

print(f'Sentence: {sample_text}')
print(f'Tokens: {tokens}')
print(f'Token IDs: {token_ids}')
Below is output of above code snippet
Sentence: One of the other reviewers has mentioned that after watching just Oz episode you'll be hooked
Tokens: ['one', 'of', 'the', 'other', 'reviewers', 'has', 'mentioned', 'that', 'after', 'watching', 'just', 'oz', 'episode', 'you', "'", 'll', 'be', 'hooked']
Token IDs: [2028, 1997, 1996, 2060, 15814, 2038, 3855, 2008, 2044, 3666, 2074, 11472, 2792, 2017, 1005,2222, 2022, 13322]
Before applying our tokens, one thing we need to do. BERT has special requirement. It wants input to be in certain format.
For BERT model we need to add Special tokens in to each review. Below are the Special tokens
- [SEP] - Marker for ending of a sentence - BERT uses 102
- [CLS] - We must add this token at start of each sentence, so BERT knows we’re doing classification - BERT uses 101
- [PAD] - Special token for padding - BERT uses number 0 for this.
- [UNK] - BERT understands tokens that were in the training set. Everything else can be encoded using this unknown token
We can achieve all of this work using hugging face’s tokenizer.encode_plus
encoding = tokenizer.encode_plus(
  sample_text,
  max_length=32,  # Here for experiment I gave 32 as max_length
  truncation = True,  # Truncate to a maximum length specified with argument max_length
  add_special_tokens=True, # Add '[CLS]', [PAD] and '[SEP]'
  return_token_type_ids=False,  # since our use case deals with only one sentence as opposed to use case which use 2 sentences in single training example(for ex: Question-anwering) we can have it as false
  padding='max_length',   # pad to longest sequence as defined by max_length
  return_attention_mask=True,  # Returns attention mask. Attention mask indicated to the model which tokens should be attended to, and which should not.
  return_tensors='pt',  # Return PyTorch tensors
)

print(len(encoding['input_ids'][0]))
encoding['input_ids'][0]
Below is output of above code
32
tensor([  101,  2028,  1997,  1996,  2060, 15814,  2038,  3855,  2008,  2044,
         3666,  2074, 11472,  2792,  2017,  1005,  2222,  2022, 13322,  1012,
         2027,  2024,  2157,  1010,  2004,  2023,  2003,  3599,  2054,  3047,
         2007,   102])
We can see that token 101[CLS] and 102[SEP] tokens got added after tokenization step
Attention mask indicated to the model which tokens should be attended to, and which should not.
# Attention mask also has same length. Zero's in output if any says those corresponds to padding
print(len(encoding['attention_mask'][0]))
encoding['attention_mask']
Running above gives
32
tensor([[1, 1, 1, 1, 1, 1, 1, 1, 1, 1, 1, 1, 1, 1, 1, 1, 1, 1, 1, 1, 1, 1, 1, 1,1, 1, 1, 1, 1, 1, 1, 1]])
I figured out that maximum length of reviews in data is 512 and 13% of reviews have max length of > 500. So not to loose any information by padding let’s use 512 as maximum length. Any smaller review will get padded with 0’s until maximum length is reached.
3) Create PyTorch dataset and split data in to train, validation and test
max_len = 512

class IMDBDataset(Dataset):
  def __init__(self, reviews, targets, tokenizer, max_len):
    self.reviews = reviews
    self.targets = targets
    self.tokenizer = tokenizer
    self.max_len = max_len

  def __len__(self):
    return len(self.reviews)

  # __getitem__ helps us to get a review out of all reviews
  def __getitem__(self, item):
    review = str(self.reviews[item])
    target = self.targets[item]

    encoding = self.tokenizer.encode_plus(
      review,
      add_special_tokens=True,
      max_length=self.max_len,
      truncation = True,
      return_token_type_ids=False,
      padding='max_length',
      return_attention_mask=True,
      return_tensors='pt',
    )

    return {
      'review_text': review,
      'input_ids': encoding['input_ids'].flatten(),         # flatten() flattens a continguous range of dims in a tensor
      'attention_mask': encoding['attention_mask'].flatten(),
      'targets': torch.tensor(target, dtype=torch.long)
    }
Lets split data in to train, validation and test data
# Lets have 70% for training, 15% for validation and 15% for testing

X_train, X_valid, y_train, y_valid = train_test_split(df[['review_processed','review']], df['sentiment'],
                                                    stratify=df['sentiment'],
                                                    test_size=0.30, random_state = 0)
df_train = pd.concat([pd.DataFrame({'review': X_train['review_processed'].values,'review_old':X_train['review'].values}),pd.DataFrame({'sentiment': y_train.values})], axis = 1)
df_valid = pd.concat([pd.DataFrame({'review': X_valid['review_processed'].values,'review_old':X_valid['review'].values}),pd.DataFrame({'sentiment': y_valid.values})], axis = 1)


X_valid, X_test, y_valid, y_test = train_test_split(df_valid[['review','review_old']], df_valid['sentiment'],
                                                    stratify= df_valid['sentiment'],
                                                    test_size=0.5, random_state = 0)

df_valid = pd.concat([pd.DataFrame({'review': X_valid['review'].values,'review_old':X_valid['review_old'].values}),pd.DataFrame({'sentiment': y_valid.values})], axis = 1)
df_test = pd.concat([pd.DataFrame({'review': X_test['review'].values,'review_old':X_test['review_old'].values}),pd.DataFrame({'sentiment': y_test.values})], axis = 1)

print(df_train.shape, df_valid.shape, df_test.shape)
(35000, 3) (7500, 3) (7500, 3)
4) Create Data generators
We always want our data to go in batches to our model. So lets create dataloaders for our train and validation data
def create_data_loader(df, tokenizer, max_len, batch_size):
  ## pass in entire data set here
  ds = IMDBDataset(
    reviews=df.review.to_numpy(),
    targets=df.sentiment.to_numpy(),
    tokenizer=tokenizer,
    max_len=max_len
  )
  # this returns dataloaders with what ever batch size we want
  return DataLoader(
    ds,
    batch_size=batch_size,
    num_workers=4
    # tells data loader how many sub-processes to use for data loading. No hard and fast rule. Have to experiment on how many num_workers giving better speed up
  )


batch_size = 16      # Bert recommendation

train_data_loader = create_data_loader(df_train, tokenizer, max_len, batch_size)
valid_data_loader = create_data_loader(df_valid, tokenizer, max_len, batch_size)
test_data_loader = create_data_loader(df_test, tokenizer, max_len, batch_size)
Now lets have a look at a single batch from our training data
data = next(iter(train_data_loader))

print(data['input_ids'].shape)
print(data['attention_mask'].shape)
print(data['input_ids'].shape)
torch.Size([16, 512])
torch.Size([16, 512])
torch.Size([16, 512])
Above output is intutitive. We said we want batch to have 16 data points each of with max_length = 512
5) Sentiment classification with Distill BERT and Hugging face
Hugging face has nice wrappers for various downstream tasks. We can use these wrappers to load prebuilt models. For our case we will be using DistilBertForSequenceClassification. This is just DistillBert model with a sequence classification head on top(i.e, Feedforward + softmax layer on top)
We can load pretrained model as below
# Lets build classifier for our reviews now. Below n_classes would be 2 in our case since we are classifying review as either positive or negative.
a
model = DistilBertForSequenceClassification.from_pretrained(PRE_TRAINED_MODEL_NAME, num_labels = 2)
model = model.to(device)
6) Training
BERT paper gave some recommendations on hyperparameters for fine tuning
-
Batch size: 16, 32
-
Adam learning rate: 5e-5, 3e-5, 2e-5
-
Number of epochs: 2,3,4
Below we initialize optimizer and scheduler
EPOCHS = 5

optimizer = AdamW(model.parameters(), lr = 5e-5)
total_steps = len(train_data_loader) * EPOCHS

scheduler = get_linear_schedule_with_warmup(
  optimizer,
  num_warmup_steps=0,
  num_training_steps=total_steps
)
get_linear_schedule_with_warmup - learning rate that decreases linearly from initial lr set in the optimizer to 0. This is important because in initial stages of learning we want higher learning rate but over the time we want learning rate to decrease so we can reach optimum better
Now its time for training
Lets define a function to train our model on one epoch
# Lets write a function to train our model on one epoch

def train_epoch(model, data_loader, optimizer, device, scheduler, n_examples):

  model = model.train()    # tells your model that we are training
  losses = []
  correct_predictions = 0

  for d in data_loader:
    input_ids = d["input_ids"].to(device)
    attention_mask = d["attention_mask"].to(device)
    targets = d["targets"].to(device)

    loss, logits = model(
      input_ids=input_ids,
      attention_mask=attention_mask,
      labels = targets
    )

    #logits = classification scores befroe softmax
    #loss = classification loss

    logits = logits.detach().cpu().numpy()
    label_ids = targets.to('cpu').numpy()

    preds = np.argmax(logits, axis=1).flatten()   #returns indices of maximum logit
    targ = label_ids.flatten()

    correct_predictions += np.sum(preds == targ)

    losses.append(loss.item())
    loss.backward()   # performs backpropagation(computes derivates of loss w.r.t to parameters)
    nn.utils.clip_grad_norm_(model.parameters(), max_norm=1.0)  #clipping gradients so they dont explode
    optimizer.step()       #After gradients are computed by loss.backward() this makes the optimizer iterate over all parameters it is supposed to update and use internally #stored grad to update their values
    scheduler.step()    # this will make sure learning rate changes. If we dont provide this learning rate stays at initial value
    optimizer.zero_grad()     # clears old gradients from last step

  return correct_predictions / n_examples, np.mean(losses)
Now lets define a function to validate our model on one epoch
# Lets write a function to validate our model on one epoch

def eval_model(model, data_loader, device, n_examples):

  model = model.eval()   # tells model we are in validation mode
  losses = []
  correct_predictions = 0

  with torch.no_grad():
    for d in data_loader:
      input_ids = d["input_ids"].to(device)
      attention_mask = d["attention_mask"].to(device)
      targets = d["targets"].to(device)
      loss, logits = model(
        input_ids=input_ids,
        attention_mask=attention_mask,
        labels = targets
      )


      logits = logits.detach().cpu().numpy()
      label_ids = targets.to('cpu').numpy()

      preds = np.argmax(logits, axis=1).flatten()
      targ = label_ids.flatten()

      correct_predictions += np.sum(preds == targ)
      losses.append(loss.item())

  return correct_predictions / n_examples, np.mean(losses)
Now comes real phase - lets train
%%time
# standard block
# used accuracy as metric here
history = defaultdict(list)

best_acc = 0

for epoch in range(EPOCHS):

  print(f'Epoch {epoch + 1}/{EPOCHS}')
  print('-' * 10)

  train_acc, train_loss = train_epoch(model, train_data_loader, optimizer, device, scheduler, len(df_train))

  print(f'Train loss {train_loss} Accuracy {train_acc}')

  val_acc, val_loss = eval_model(model, valid_data_loader, device, len(df_valid))

  print(f'Val   loss {val_loss} Accuracy {val_acc}')
  print()

  history['train_acc'].append(train_acc)
  history['train_loss'].append(train_loss)
  history['val_acc'].append(val_acc)
  history['val_loss'].append(val_loss)

  if val_acc > best_acc:
    torch.save(model.state_dict(), 'best_model_state_a5.bin')
    best_acc = val_acc

# We are storing state of best model indicated by highest validation accuracy

Now the model is trained and model coefficients are saved, lets load the model coefficients which gave highes validation accuracy
# lets load trained model

path1 = "/content/drive/My Drive/IMDB Dataset/best_model_state_a4.bin"

PRE_TRAINED_MODEL_NAME = 'distilbert-base-uncased'

model = DistilBertForSequenceClassification.from_pretrained(PRE_TRAINED_MODEL_NAME, num_labels = 2)
model.load_state_dict(torch.load(path1))

model = model.to(device)    # moving model to device. Device here can be GPU or CPU depending on availability
Now lets test our model on test data. This is important because our model did not see this data when training or when tuning hyperparameters. So peformance on this dataset in our final accuracy
test_acc, _ = eval_model(model, test_data_loader, device,len(df_test))
test_acc.item()
Our model gave accuracy of 93.06% on test data.
References:
- Hugging Face official website
- BERT: Pre-training of Deep Bidirectional Transformers for Language Understanding
- DistilBERT, a distilled version of BERT: smaller, faster, cheaper and lighter
- Sentiment Analysis with BERT and Transformers by Hugging Face using PyTorch and Python by Curiousily


